his name is Rub N Buff!
I've read numerous blogs raving about this stuff but had yet to try it out for myself. I finally
stopped at Michaels to make my purchase. I was pleasantly surprised at the price $4.49
plus I of course had my 40% off coupon! I knew from my blog reading that this little amount
would last me a long time too.But , I was not prepared for the fact that it came in so many
colors? Antique Gold or Grecian Gold...how do I know which gold is the right gold?! I like
antiques, does that mean I'll like the look of antique gold? I guess we'll find out!
 |
| rub N buff |
 |
| gold key |
 |
| silver key |
little project with but just can't seem to find the right ones. I liked the shape of both of these
and the price, but the brassiness of the gold and the silver were a no-no. The perfect excuse
to use my new Rub N Buff! I literally skipped to the register! I just need to find 1 more key to
make a perfect 3! I guess I'll have to go to a different Michaels later this week :p .
A little goes a long way with this stuff! I used the above amount and just a smidge more for
1 entire key (and yes I did the entire project on my dining room table on a trusty paper
plate).
* TADA*
So I must admit, I didn't actually Buff like I
should have with the keys. I liked how it
looked without taking toooo much off and it
dries quick! They are definitely much cuter
than before. But then I started looking
around my house wondering what else
I could add gold too. there are endless possibilities but I was looking for a good, quick fix.
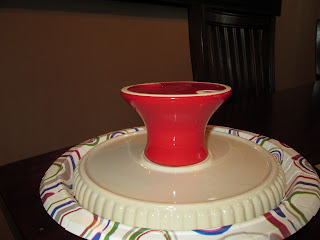
Enter the $2 cake stand from the Salvation Army that I have a love/hate relationship with.
I loved him for my valentines day table display and have either loved or hated him every
day since. I bought him with the intention of somehow painting the bottom red part a fun
color and instead left him smack dab on mah counter for the next 5 months to taunt me!
Enter the Rub N Buff and my trusty paper plate!
I flipped that bad boy over and started to rub AND actually buff this time! The 1st coat let
most of the red shine through, the 2nd coat was starting to get a little bit better and the 3rd
coat was just right! No I'm not just getting back from reading Goldilocks and the 3 bears,
but thanks for asking! ok so it's not perfect and you can totally see the lines in this picture,
but in person it looks pretty durn good if I do say so myself! Plus, who's going to be looking
that closely at my sweet lil ole' cake stand anyways!!! AND I love it! I keep staring at it and I
may even do a little display with the keys on top!


I never even heard of this stuff before!!! Is it just for metal? It came out looking great!!!
ReplyDeleteNope, you can use it on wood too! : )
ReplyDeleteThanks for using AMACO's Rub 'n Buff. FYI - it is available in about 17 colors. You can see all of them on our website, amaco.com. We also have a Facebook page, Rub 'n Buff Metallic Finishes, where we share all different kinds of projects with RNB. Check it out!
ReplyDeleteThanks!
DeleteRub n Buff has sure made its way through blog-land. Your projects came out nice. Thanks so much for stopping by my blog.
ReplyDelete